How to Render Animations in FluidRay
In this tutorial we will show you how to quickly render camera animations in FluidRay.
If you are a designer, sometimes making a quick video is the most effective way to show your product to a client. Or, if you are an Architect, a camera walk-through can immerse your clients in the spaces you have created for them.
Making such videos is really easy in FluidRay.
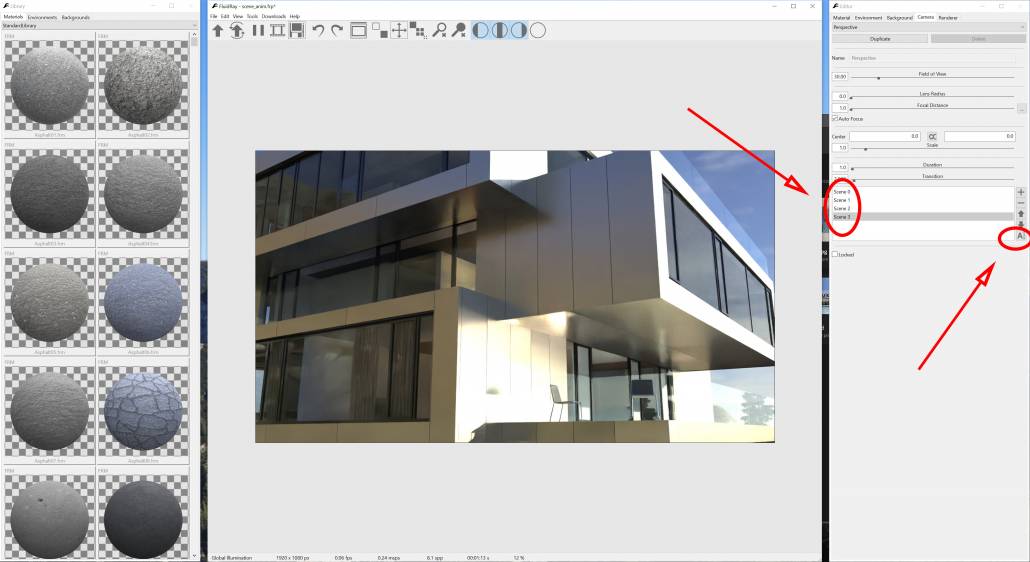
Start by loading your project, then navigate to the Camera tab on the Editor window that is located on the right.
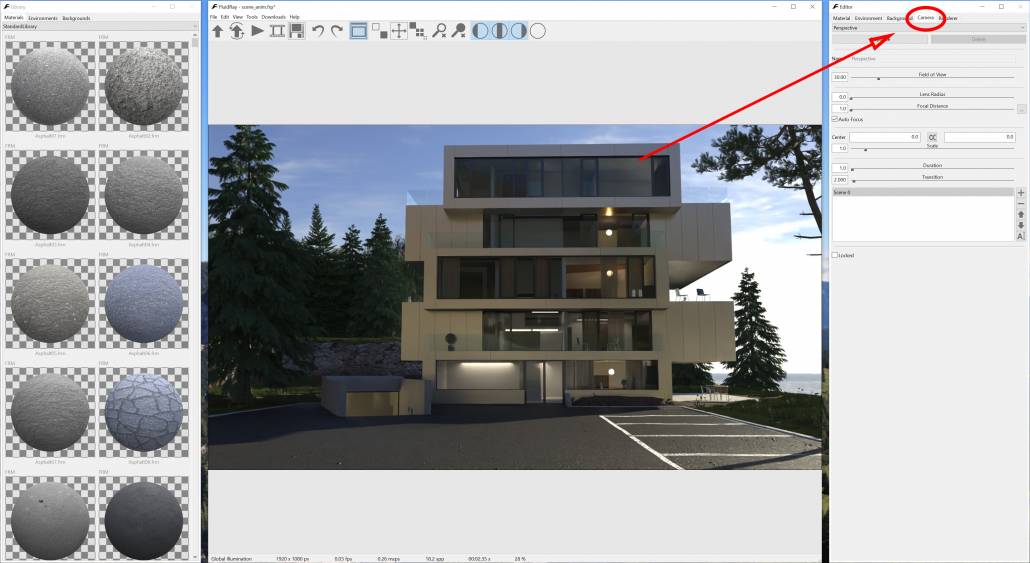
There are a few buttons on the bottom right of the panel that allow you to manipulate the different “Scenes”:

A “Scene” is a point of view that your camera will go through. After you have added a few scenes with different point of views, FluidRay will automatically create an animation by transitioning between them.
Click on the “+” button to add a new scene, then move the camera to another point of view:
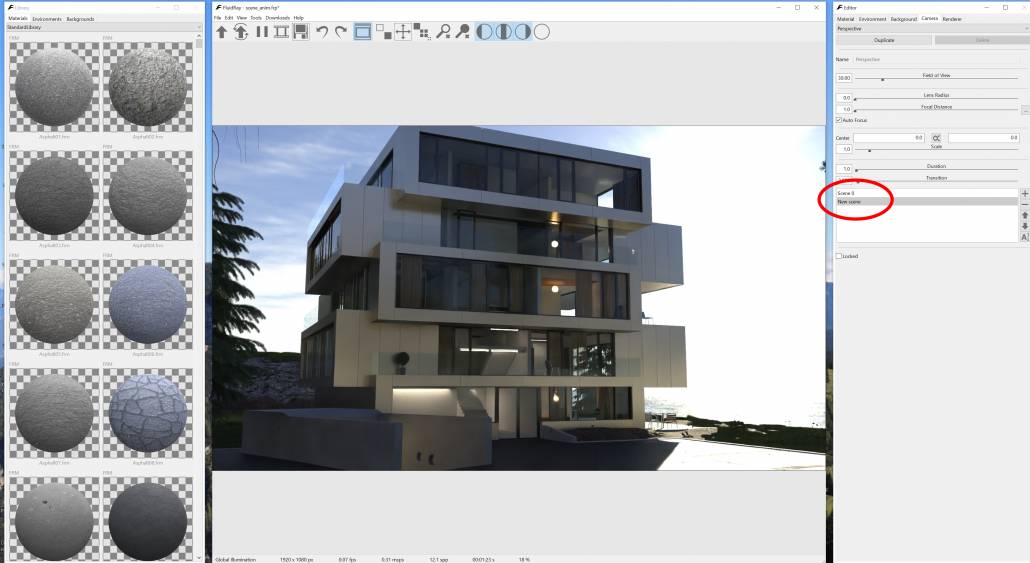
Keep adding points of views to cover all the walkthrough.
You can also rename the scenes by clicking on the corresponding name or by clicking on the “Rename” button:
Two parameters are important for animation – Transition and Duration:
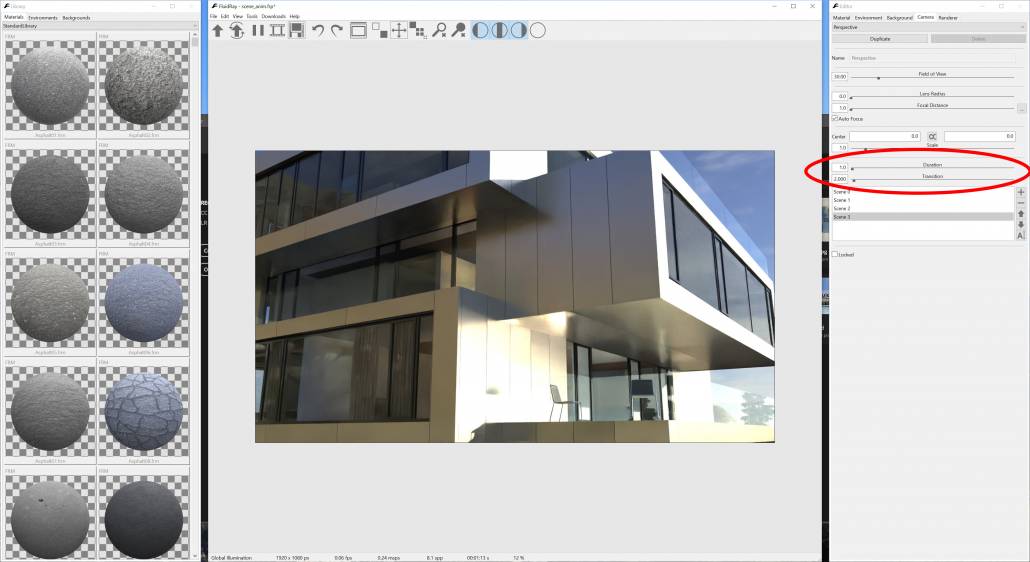
- Duration: how long, in seconds, the camera stays fixed in the same point of view
- Transition: how long, in seconds, the camera takes to go from a point of view to the next
We can now ready to render our animation. To access the render animation dialog, press the “Reel” button on the main toolbar or go to the menu Tools -> Render Animation:
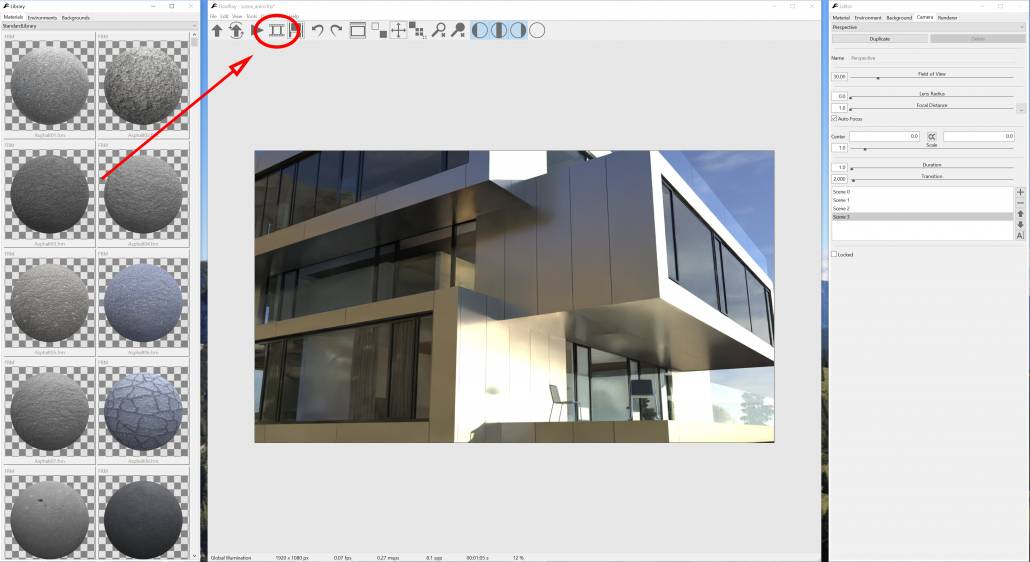
The Render Animation dialog appears:
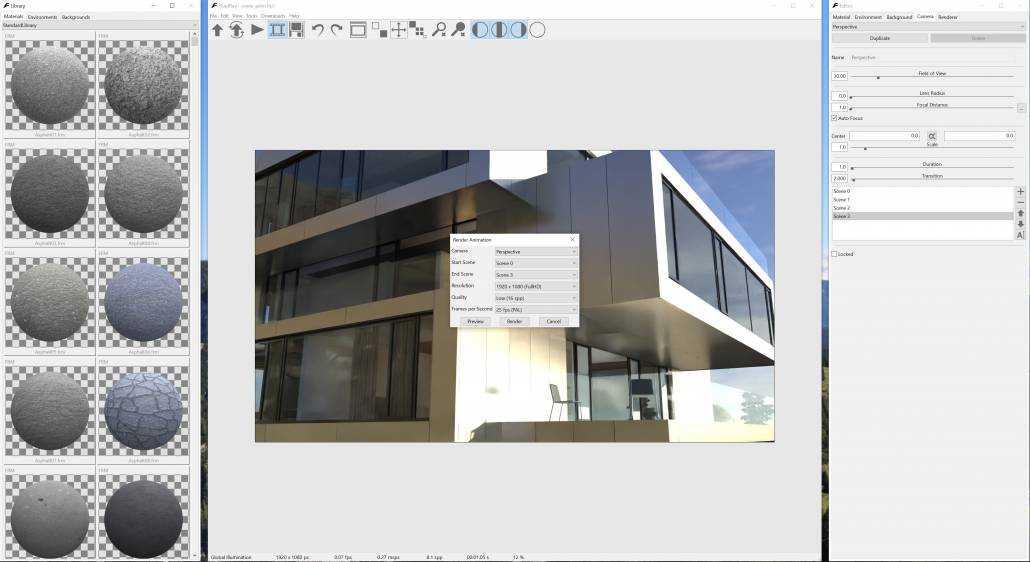
The following options are available in the Render Animation dialog:
- Camera: the camera to be used for the animation
- Start Scene: the scene (point of view) where the animation starts
- End Scene: the scene (point of view) where the animation ends
- Resolution: animation resolution. The smaller the resolution the less time it will take to render the animation
- Quality: the samples per pixels used to render the animation. Lower values will result in lower quality but quicker render times.
- Preview: the preview button will show a quick preview of the animation, useful to check the animation before starting the final render.
- Render: the render button starts rendering the animation.
By clicking the Render button you’ll be asked the location where to save the rendered animation:
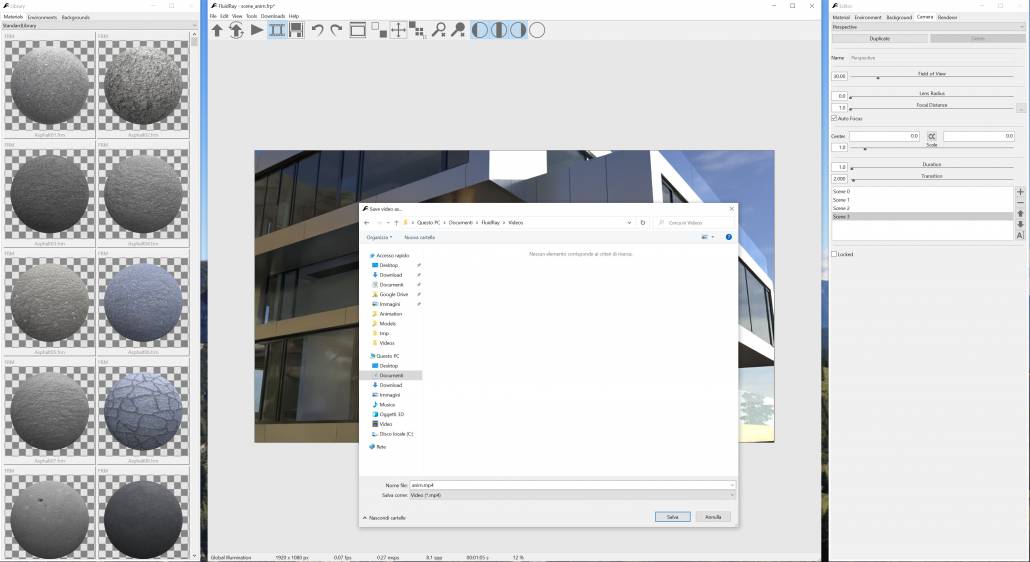
Note that when selecting the location where to save the video, it’s also possible to decide if to save the animation as a video file (.mp4) or as multiple image files to be joined together at a later time.
This concludes the tutorial. If you have questions, please post them on our Discussion Forums.
If you would like to try FludRay, download the FREE TRIAL.
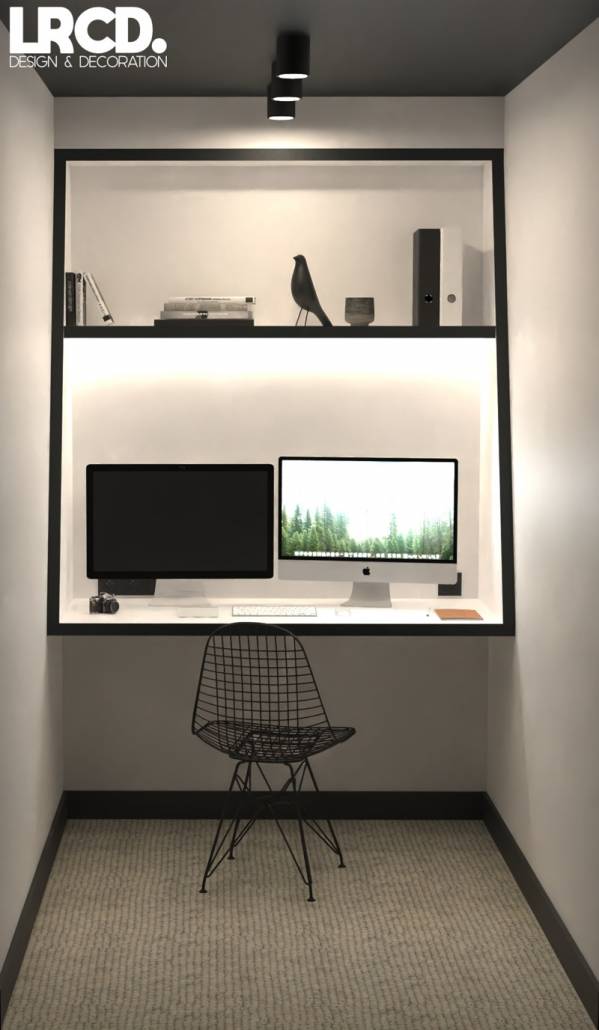
Customer Spotlight: Interior Designer Loris RECULARD Appreciates FluidRay
What if you could quickly create beautiful images of your interior design ideas so you still have time to meet clients and craftsmen, create physical spaces, explore furniture and other decorations, and manage your business? That is exactly what Interior Designer, Loris RECULARD, is able to do once discovering FluidRay.
“FluidRay is very efficient! I can spend time rendering my designs and I still have time to create spaces, explore furniture and decorations, and meet clients.”
Loris RECULARD
Clients who hire an interior designer are not only looking for creative changes to a living or work space or to elegantly furnish a new space but they are also expecting fantastic service, strong organization, and attention to fine details. These are a lot of expectations! Rather than fret, Loris RECULARD sets himself apart from competitors by creating rendered images of his design ideas while still providing clients with the level of service they expect. He shares these images with clients to fully bring his design ideas to life and clients appreciate the realistic preview into what their space will eventually be.
We asked Loris why he chose FluidRay as his rendering software of choice, here’s what he told us:
- FluidRay is fast and efficient to create fantastic renderings
- FluidRay is affordable and so easy to learn, even for someone new to rendering
- Since FluidRay works in real-time, corrections and edits to designs are immediate
- Because FluidRay is a standalone tool rather than a plug-in, it’s easy to have one project going in FluidRay and the next already started in SketchUp
- Awesome, realistic results!
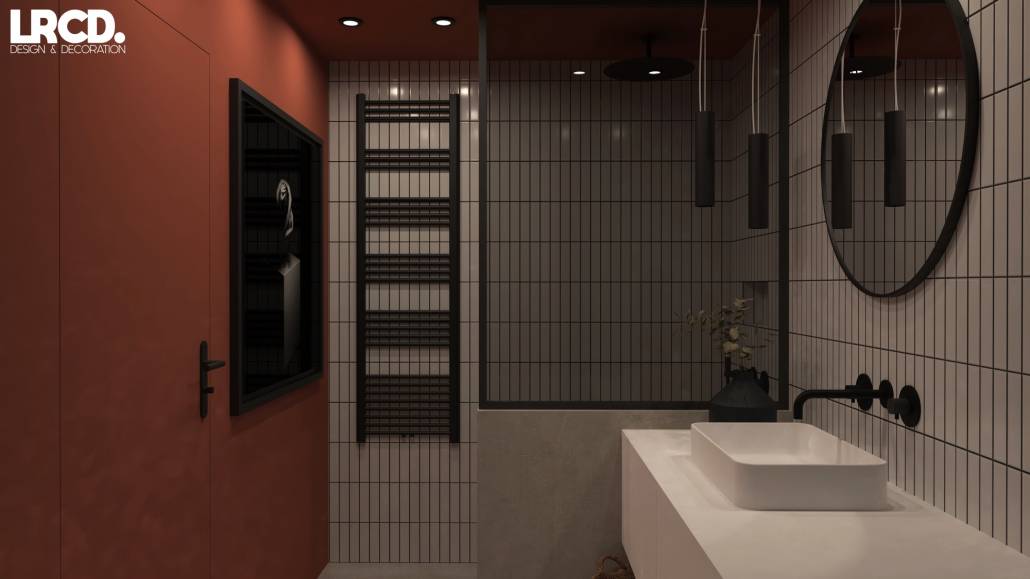
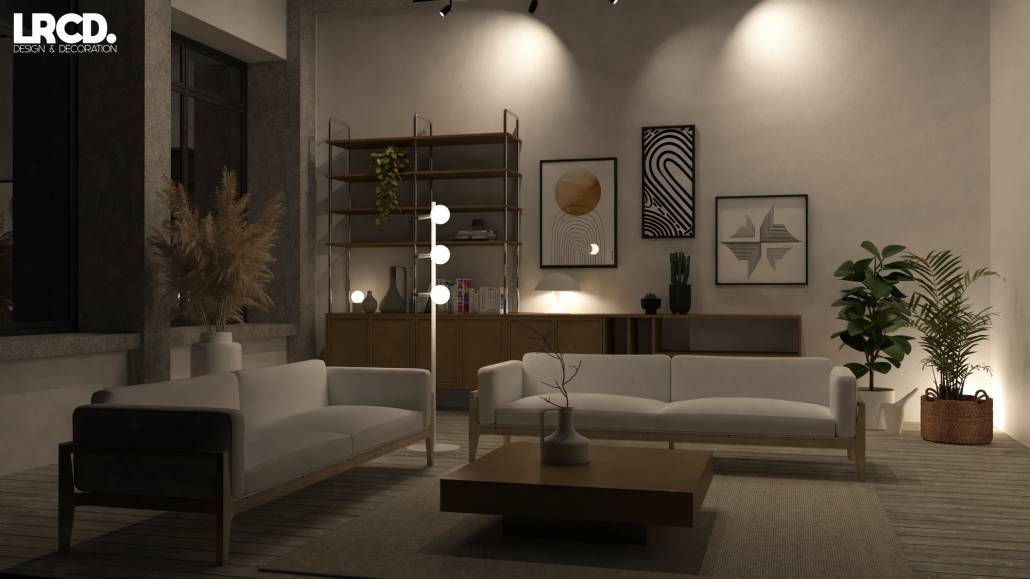
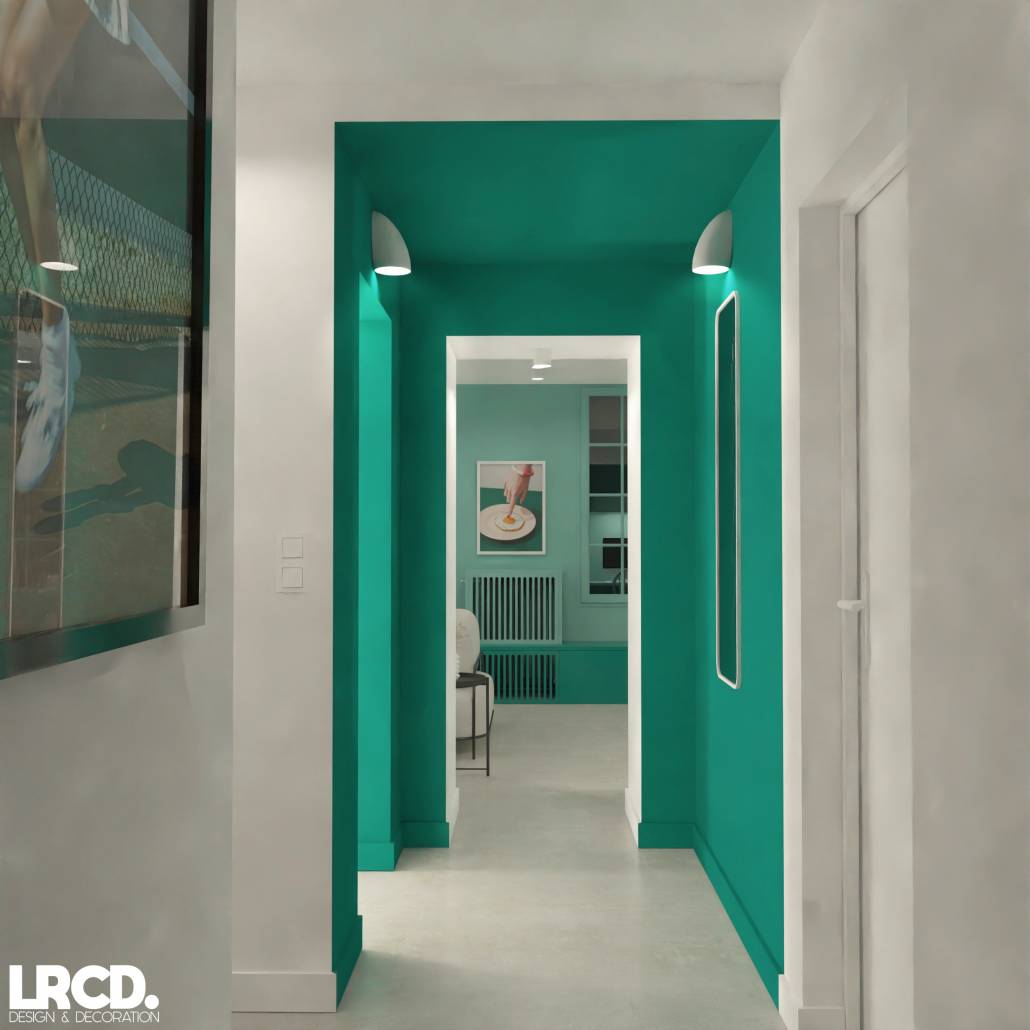
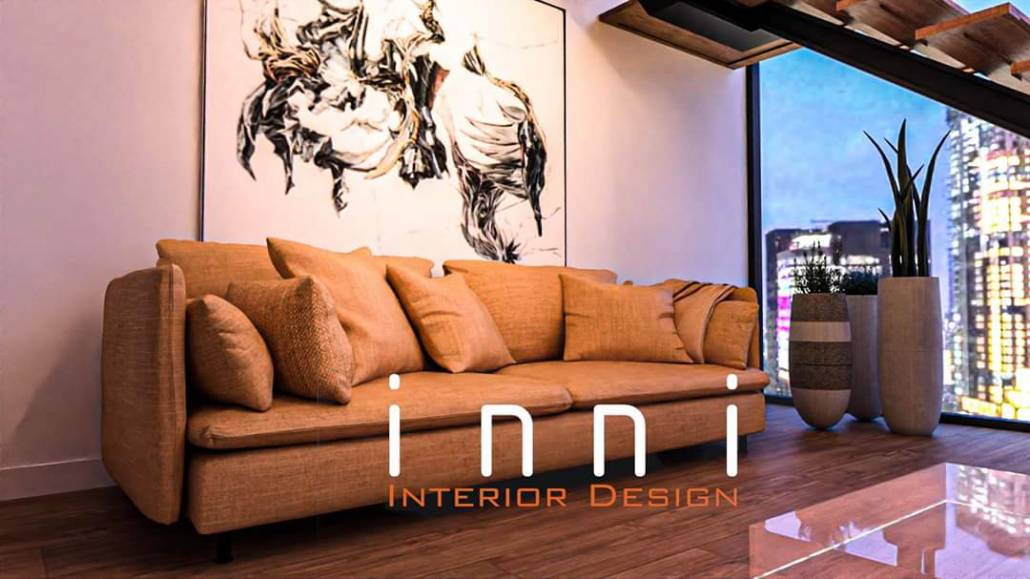
Loris RECULARD designs interiors for both living and professional spaces. These renderings are shared from a few recent projects and beautifully showcase his interior design skills. With these renderings, his clients can easily envision what their spaces will be at project completion. No detail is forgotten!
If you are interested in trying FluidRay for your interior design projects, please visit our website for a free-trial. You will see how fast and easy it is to turn your 3D models into realistic images that will impress your clients!

To see more of Loris’s beautiful work, check out https://www.loris-reculard.com/. You can also follow him on Instagram @lorisrcd where you can view his most recent creations!
Customer Spotlight: Product Design Student, Peter Zheng, Uses FluidRay to Present Product Ideas
Here’s something you probably haven’t seen before – a high-end, simple, ergonomic, and beautiful hair dryer. Sorry though, this product isn’t available just yet!
The FluidRay team first noticed Peter’s unique product ideas on Instagram (https://www.instagram.com/peterzheng99/). Peter’s designs and his ability to realistically render the images caught our attention and we knew we needed to know more. As a student at Rhode Island School of Design, Peter spends a good portion of his days learning about product design and putting his skills to the test. Because of this, FluidRay is thrilled that Peter has incorporated our rendering tool into his education.
“Rendering software is like the most critical step for product design to turn ideas into reality, quicker than making mock up models. The rendered items can give viewers (my professor) a visual impression.”
Peter Zheng
Product design depends heavily on visual models of how a product is intended to look. Peter specifically chose FluidRay for the following reasons:
- FluidRay is affordable – even for a student!
- It has an easy user interface
- FluidRay is a fast, real-time renderer
- Materials needed for product designers are already in the FluidRay library
Affordable Rendering Tool
Our pricing plans make FluidRay accessible to anyone with no long term contracts or hidden fees making it the tool of choice for students, independent designers, and firms alike. Learn more about our pricing options and find a plan that works best for you.
FluidRay Is Easy to Learn
FluidRay’s intuitive interface and straightforward training resources make learning 3D rendering effortless. Our engineers designed FluidRay with usability in mind and the workflow can be grasped in a matter of minutes. Check out our training tutorials for more details on learning how to render images in FluidRay. You’ll create designs quickly and easily, freeing yourself up to focus on imagining your next amazing project!
Real-time Renderer
FluidRay’s real-time capabilities allow you to immediately see edits and adjust designs on the fly. Decisions are made quickly and efficiently to shave time off your projects.
Extensive Materials Library
To make rendering even easier, FluidRay comes with a large library of environments, materials and backgrounds to suit most any design project.
“FluidRay’s user interface is more straightforward compared to other rendering software, which means it requires less or no learning curve.”
Peter Zheng
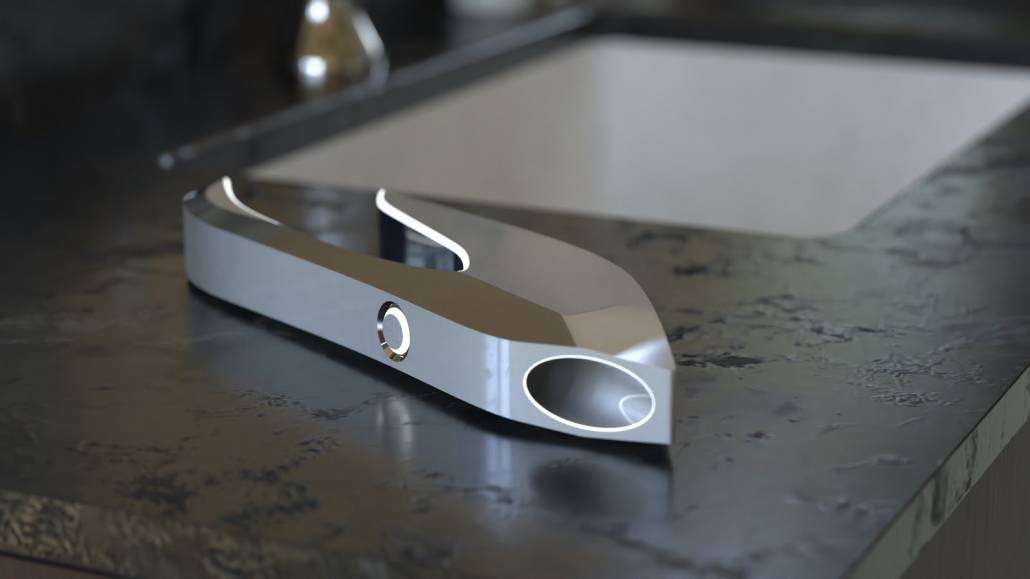
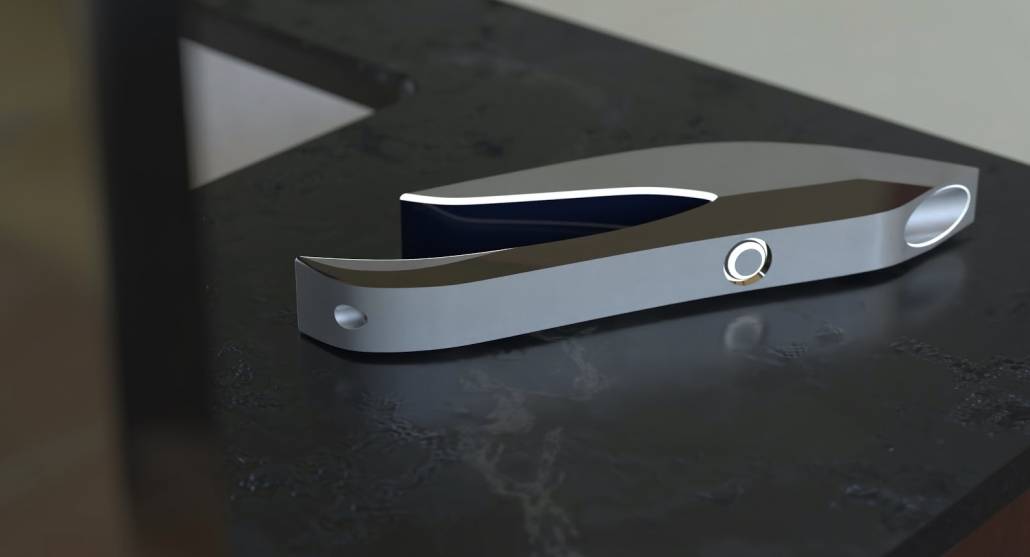
For Peter’s design project, he needed to redesign an everyday product. He chose a hair dryer.
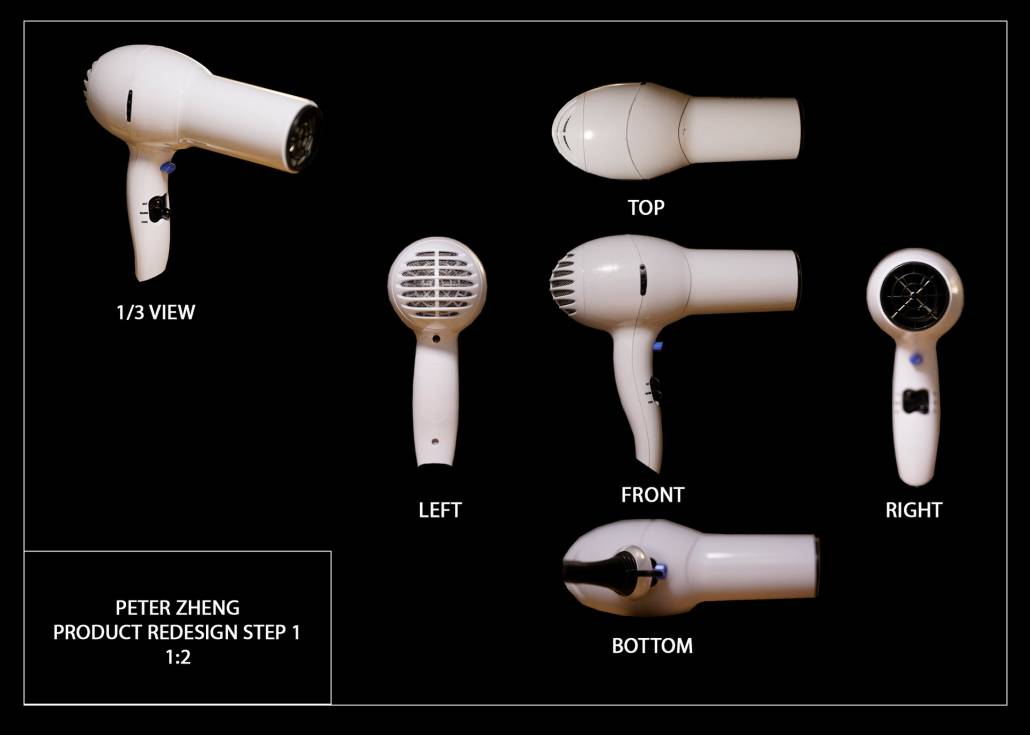
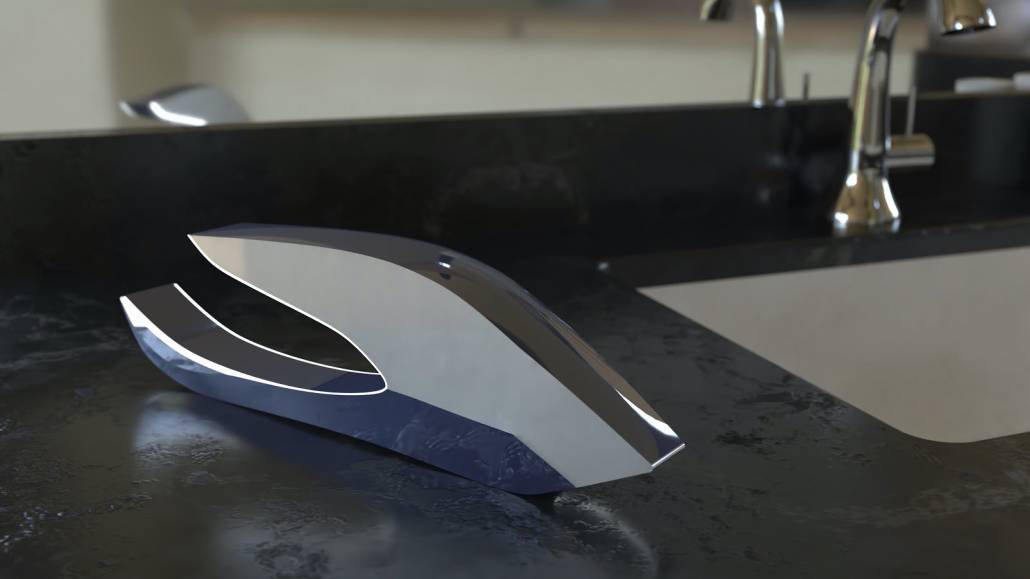
Peter wanted to step away from the traditional form of a hair dryer and create something beautiful and more ergonomic. He used Rhino to model the object and the scene, then imported the model into FluidRay to render it.
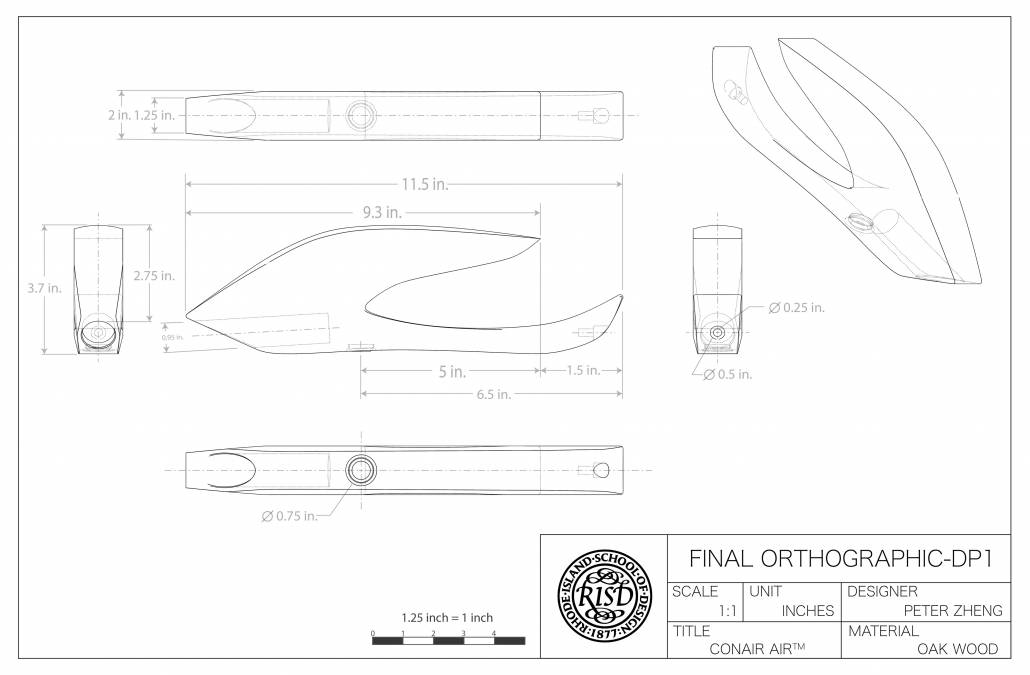
In addition to modeling the ergonomic hair dryer, Peter developed a wooden prototype as an offer of another way to view the product.

The following rendered images show the hair dryer in its setting. You can appreciate the sleek design and imagine how it look on a bathroom counter. Beautiful!
To check out more of Peter’s designs, please visit his website where he showcases his design skills and the power of FluidRay!
If you are interested in trying FluidRay for your product designs, please visit our website for a free-trial. You will see how fast and easy it is to turn your 3D models into realistic images that will inspire your audience!
Rendering Software Important Features for Interior Designers
Many interior designers already know how much their clients appreciate seeing realistic images of interior designs. A rendered image allows designers to create very detailed and realistic designs to share with their clients. These detailed images make communicating ideas efficient and effective, saving money on your projects.
If you’re an interior designer just getting started with 3d rendering, what features in rendering software should you care about? As you begin to analyze the many vendors that sell rendering software, you’ll notice there are many features to consider. Which ones matter? We’ve compiled a list here for you of rendering software features that interior designers care about. Keep these in mind as you do your research but remember – the best way to analyze software is to try it yourself. FluidRay makes it easy by offering a free trial so you can do just that.
Happy rendering!
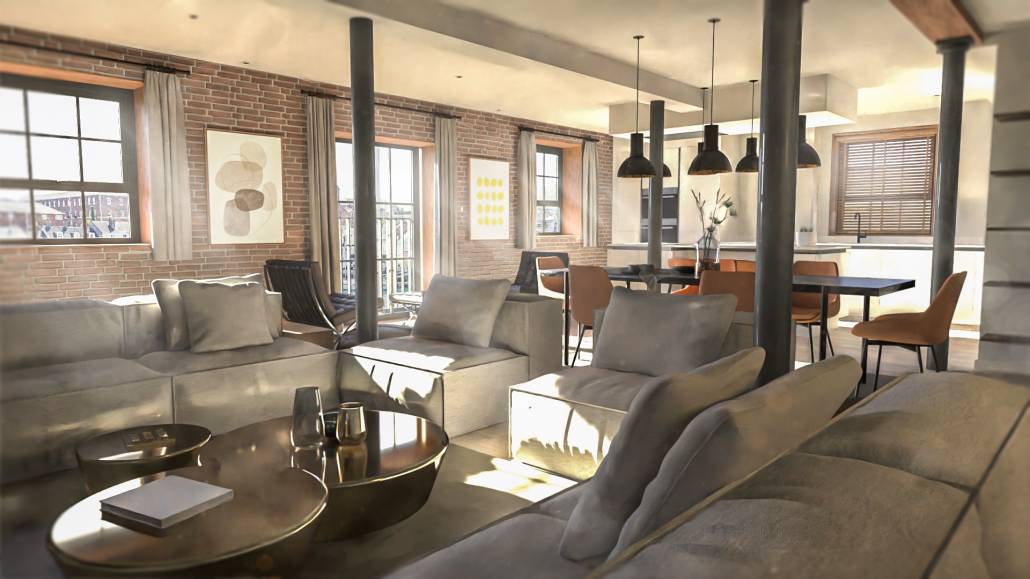
deheers.com/apartments/
Rendering Software Important Features for Interior Designers
Easy to Learn
You want to work in an intuitive interface with straightforward menus to keep your projects moving along quickly. As you are considering different software, determine what support the rendering software vendor provides. Are tutorials available and easy to find? Are experts available to answer questions? You want to be up and running as quickly as possible so selecting a rendering tool that is easy to learn is one of the most important features and why we’ve listed it first. Interior designers need to spend their time designing, not fiddling around in new software.
Compatible
Rendering software starts with a 3D model created in modeling software such as SketchUp, Rhino, or AutoCAD. Make sure your rendering software is compatible with the modeling tool you use. FluidRay, for example, works with any 3d modeling software that lets you export model files. This flexibility is ideal for designers who use more than one 3d modeling software or plan to switch in the future.
Works Well on Most Computers
Rendering software is often hardware intensive and designers sometimes need to purchase bigger, more expensive systems to run their rendering software programs. This is not true, however, for all rendering software. Look for a program that will run on the computer you already own, your bank account will thank you for it!
Affordable
Why spend more than is necessary on rendering software? Prices range dramatically and it’s important to map your needs to software features to avoid over paying. Look for software that offers a free trial to help determine if the software is a good fit for your workflow.
Does What You Need It to Do
Interior designers need a rendering tool that provides the following specifics:
- Lighting: Lighting is an important part of rendering because it helps bring an image to life. You want many lighting options, both inside and outside, and you want it to be FAST.
- Extensive materials library: You’re going to need a large amount of materials available, particularly if you design a variety of interiors. You’ll want many fabrics, paint colors, surfaces, flooring options, lights, and everything else you might include in a design. Make sure your rendering tool has you covered.
- Caustics: Will you include water in your designs? Perhaps you will design an indoor fountain or pool. You’ll need to confirm your rendering software efficiently handles this small, yet important, detail.
- Camera positioning: As you create designs, you want your images to be viewed from multiple angles as well as very specific angles like from above or a side view. Check out camera positioning when you evaluate software.
- Flexible emissive materials: If you plan to include a fireplace in any of your designs, you want to be able to make emissive materials transparent. Think of flames in a fireplace and how delighted your clients will be to see that in a rendered image.
Real-time Rendering
Surprisingly, the real-time feature is not available in all rendering software applications. This important feature lets you see changes to your rendering as you make them instead of being required to wait several minutes or hours to see changes. Not only does this streamline your workflow but it also makes client communication extra impressive. Imagine your client’s delight when granite is changed to marble right in front of her eyes!
This list of important rendering software features will jumpstart your selection process! Why not try FluidRay? It excels in each of these features and is proven among designers, particularly interior designers.