Customer Spotlight: How THE small HOUSE CATALOG Uses FluidRay to Bring Designs to Life

Have you ever dreamed of owning a small house, living simply, and only with your essentials? Shawn Dehner brings this dream to reality. He runs THE small HOUSE CATALOG, an architectural design company that creates both custom and stock plans for clients located all over the United States, Canada, and beyond. 

“This is truly a great product that I’m excited to be using. It’s one of a kind!”

SHAWN DEHNER Owner, THE small HOUSE CATALOG

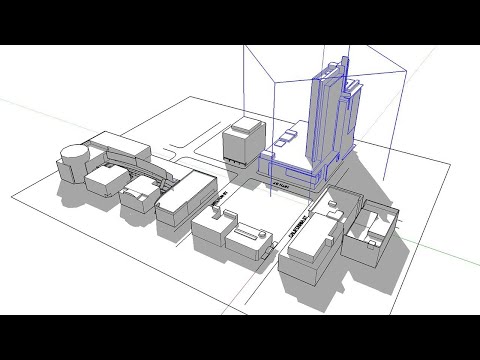
Architectural design is a very visual industry. Shawn had long been wanting to take his designs to the next level in terms of presentation for both custom design clients and stock plan customers. The simple schematic presentations were lacking the storyline he wanted to share. Additionally, feedback from his tens of thousands of blog subscribers was for additional interior and exterior images of the designs. This was one of the top requests from Shawn’s subscribers in 2019. It is clear that his followers wanted to be able to better visualize themselves living in a small house. Shawn determined it was time to learn rendering so he could share realistic images of his small house designs. 

Sommerhus

Every week Shawn is hired by a variety of client types. Homeowners make up most of his custom business but he also supplies builders and prefab construction companies. The stock plans found on THE small HOUSE CATALOG website sell daily to a mix of customers including individuals, builders and schools. With this diverse customer base, Shawn needed to find a rendering tool that could create many renderings that appeal to a lot of people with a lot of uses. The tool also needed to be capable of creating renderings quickly and easily.

“I have to tell you, FluidRay really just worked for me right out of the box. I’d struggled with some other top notch competitors and I could not get them to function well. I found FluidRay one night surfing for rendering reviews and came across videos created by the company. I thought the renderings looked gorgeous and every bit on par with other rendering engines I was trying – and better generally. Also, the UI seemed to make sense – and it does. I was sincerely thrilled and relieved to find FluidRay.”

Kukui

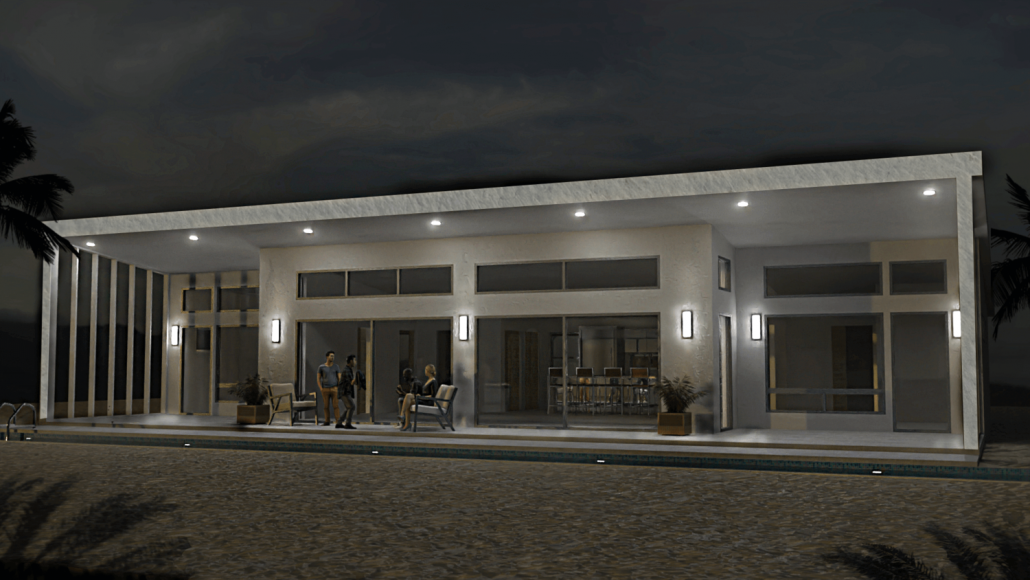
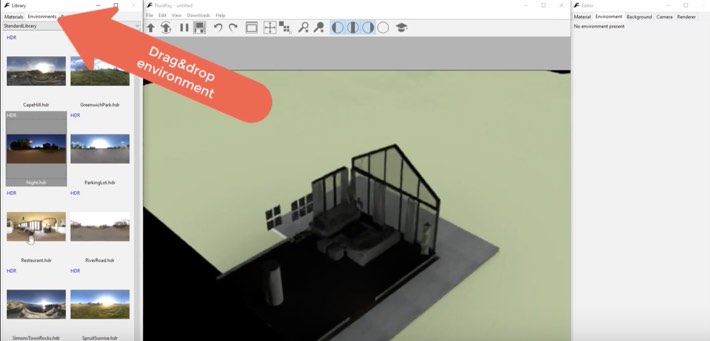
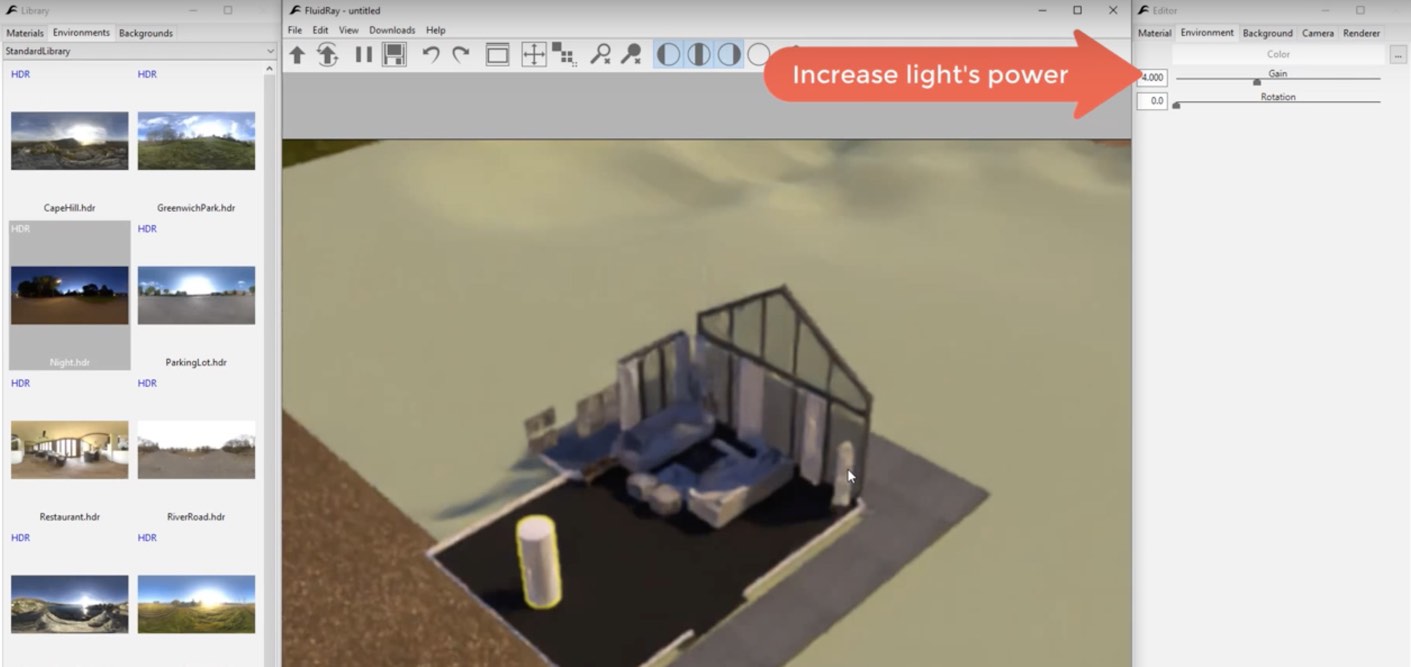
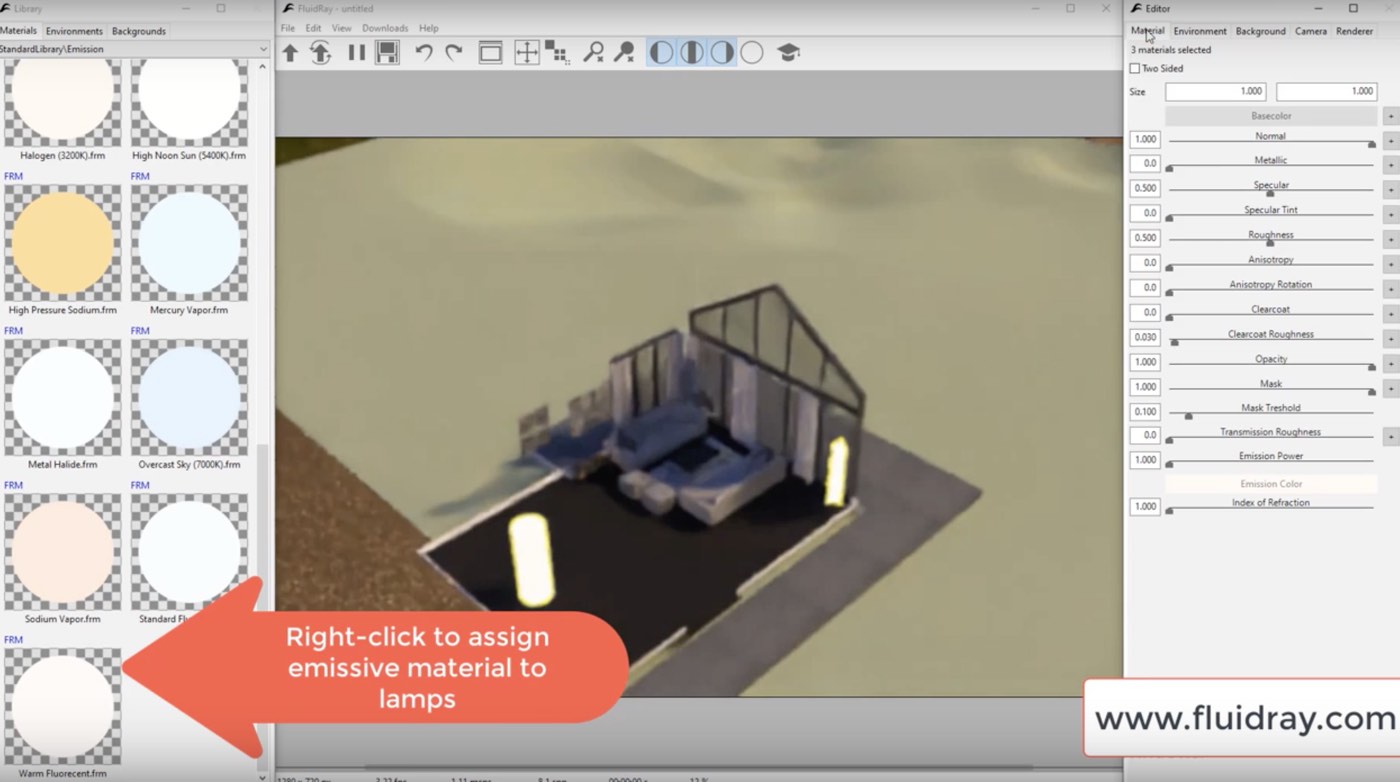
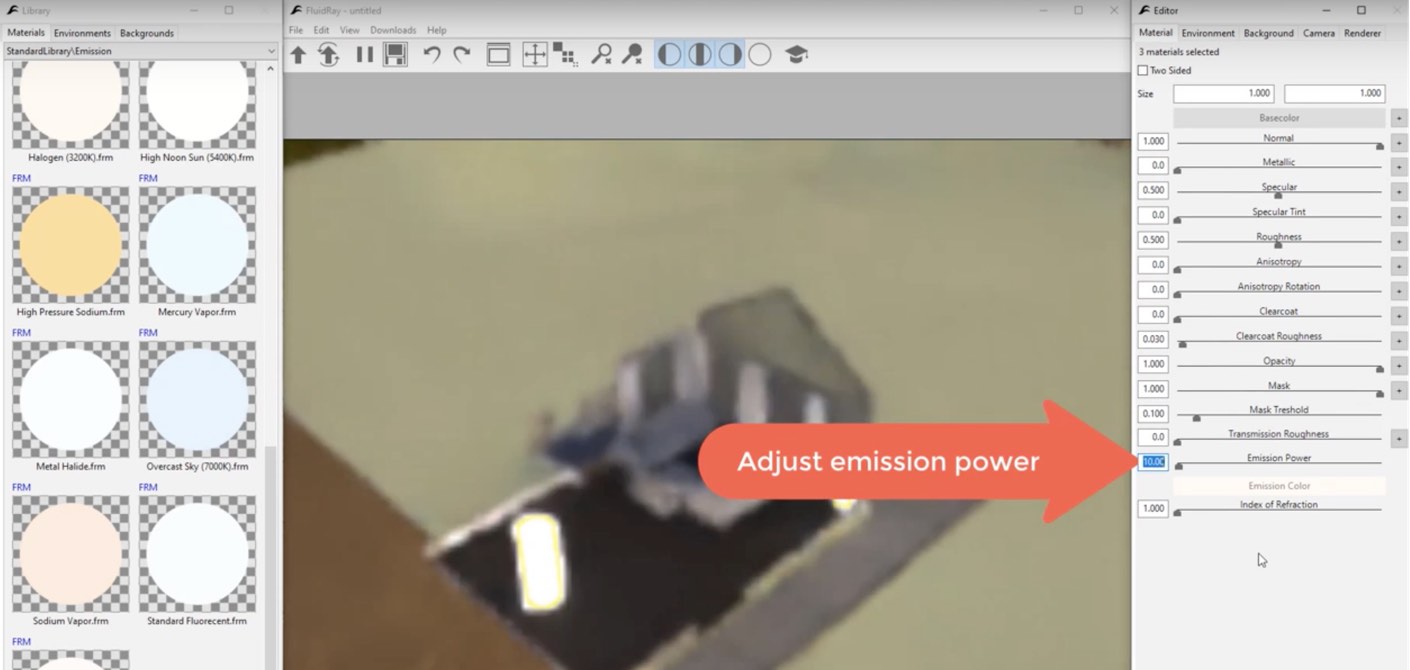
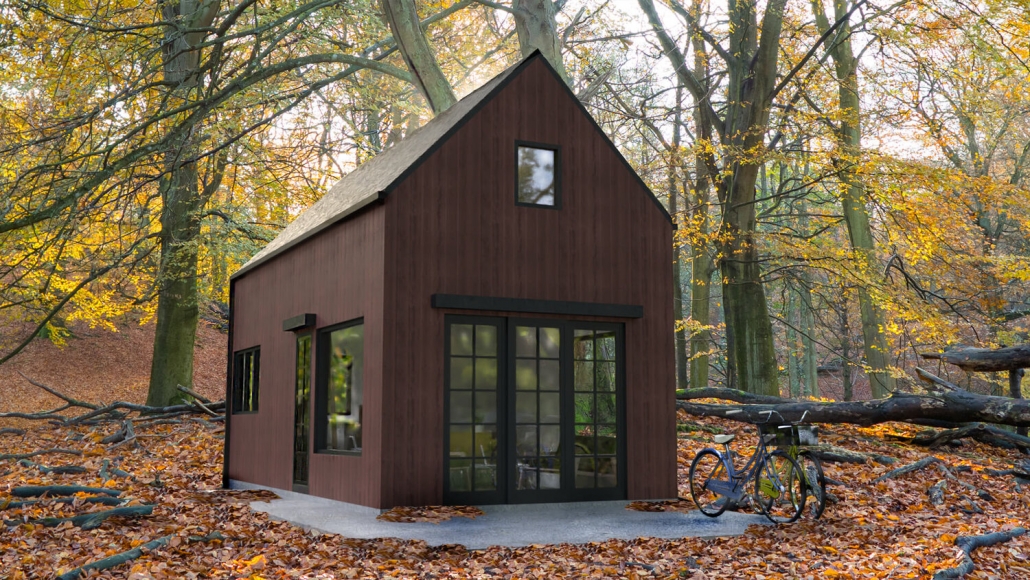
Shawn quickly discovered how easy it was to download and learn FluidRay using the intuitive interface and the tutorials available on FluidRay’s website. With Shawn’s renderings on his website, smallhousecatalog.com, visitors can now click through different home design images and tour each house. The renderings allow visitors to visually take in cathedral ceilings, look out large windows, check out flooring materials, examine storage compartments, and more. On top of the easy-to-follow tutorials, Shawn finds the customer support team responsive and helpful for anything he can’t answer on his own. 

“Whenever I have an issue it’s replied to and addressed quickly. I find this incredible in today’s world.”

Moschata

While FluidRay is a subscription based service, Shawn is delighted with how affordable it is, even for a small business. And because Shawn is the only designer at THE small HOUSE CATALOG, he has very little extra time to create renderings. Since FluidRay is so easy to learn and use, Shawn is able to create renderings, complete his monthly plan releases, and take care of his clients.

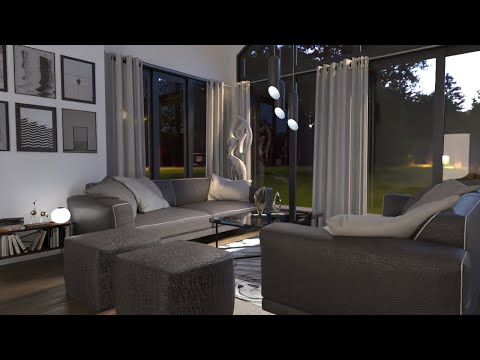
THE small HOUSE CATALOG has fully incorporated FluidRay into its business process and is now creating jaw-dropping renderings using FluidRay. Shawn prefers an “artsy” style to his client presentations and he is able to achieve exactly this with FluidRay. He is able to create renderings that add clarity to projects and help set a tone and tell a story about each small house design. Considering that THE small HOUSE CATALOG stock design sales are up 20-25% each month so far in 2020, FluidRay has become an essential part of THE small HOUSE CATALOG!

Are you ready to try rendering for your architectural designs? Our pricing is inexpensive and we offer a free trial so you can see how fast and easy it is to turn your 3D models into realistic images that will inspire your clients. To learn how to create beautiful renderings in FluidRay, we provide a library of training tutorials. Experience the good side of rendering today!

Jewelry Rendering Tutorial with Rhino and FluidRay

We just released a new tutorial video on how to render jewelry designs with Rhino and FluidRay:

Jewelry Rendering with Rhino and FluidRay

6 Reasons to Use a Rendering Tool in Your Next Architecture Project

What are 3D renderings and can they benefit your architectural projects? Architectural renderings are realistic computer generated images that are often created for presenting design ideas.  Starting with a 3D model created in a design tool like SketchUp or Rhino 3D, designers then transform this model into beautiful rendered images and videos that bring their design ideas to life. Renderings realistically incorporate textures, lighting, materials, backgrounds and colors to 3D models that enable clients to accurately imagine the final project. 

By eliminating issues and iterating on designs early in the design process, renderings ultimately save designers time and money. Clients can “tour” a building and explore its details even before the construction crew breaks ground.

Here are 6 reasons to use a rendering tool in your next architecture design. 

1. Create more detailed designs

Architectural clients appreciate and will focus on details. While a 3D model is a great starting point, it lacks details. A rendered model contains the details a client requires. These realistic renderings let clients see what the finished project will look like in the exact environment in which it will be built. Clients are able to visualize the entire project, sampling different items such as materials, fixtures, paint colors, and lighting quickly and easily. Seeing the final project makes it easy for a client to visualize their future building and ultimately select you as their architect for the project.  


Exterior render with pool

2. Save money by discovering issues early in the process

Renderings bring a design to life. Designers and clients can see what the final building will look like before construction begins. By examining the details of a building before construction begins, issues become apparent early. Eliminating issues early in the design process keeps the project moving forward and avoids costly delays. 

3. Impress clients with a leading-edge appearance

Give yourself an edge by using 3D renderings to demonstrate to your clients you are up to speed on the latest technologies. Your design presentations will highlight your architectural abilities in an easy to view format. Including renderings in your design presentations will enable clients to better appreciate your architectural abilities. Architecture is highly competitive and design presentations must be attention grabbing. Renderings do exactly that. Because of the real-time nature of FluidRay, you can adjust designs on the fly; creating more excitement and winning over even the most demanding of clients. 

4. Change options in real time & offer multiple options 

Clients are notorious for not knowing exactly what they want or they change their minds several times during the design process. This is natural and should be expected and incorporated into timelines. Using a rendering tool, like FluidRay, allows for multiple design options to be shared and details to be modified in real-time to better facilitate the process. When clients can see multiple options, decisions are made quickly and efficiently shaving time off a project.

5. Improve marketing of your firm 

Have you visited a website and known immediately that it represents an excellent firm? Potential clients visit architectural websites to view previous projects and to understand capabilities and specialties. Using renderings in your case studies, on your website, in your proposals, and in your marketing materials gives a professional, high-quality presentation to the clients considering you. These images can and should be shared across all marketing channels to showcase your capabilities to a large number of clients. A strong online presence is a low cost way to attract new clients and rendering will help get you there. 

6. Communicate ideas easily

Effective communication of design ideas and iterations is certainly one of the most important aspects of the relationship between architect and client. FluidRay plays an important role in this communication. FluidRay renderings are fast and easy to create. Simply import a 3d model into FluidRay, begin applying materials and environments, and adjust the settings until your rendering is complete. This process takes just a few minutes and the results can be shared easily either in person, over a screen share or electronically shared images. Because of FluidRay’s real-time nature, modifications are made in seconds enabling communication between you and client to move forward efficiently.


Are you ready to try rendering for your architectural designs? Our pricing is inexpensive and we offer a free trial so you can see how fast and easy it is to turn your 3D models into realistic images that will inspire your clients. To learn how to create beautiful renderings in FluidRay, we provide a library of training tutorialsExperience the good side of rendering today!

How to Create Realistic Interior Lighting with FluidRay

We are in trying times. No matter each of our specific situations, everyone has been affected by the global pandemic and we’ve all had to modify our day to day lives in order to keep our communities safe. The FluidRay team wishes everyone the best as we all adjust. 

Are you able to work remotely? Why not use this time to refine your rendering skills with these tips on how to use FluidRay to create renderings with realistic lighting? 

Proper interior lighting is crucial when designing an interior, particularly when working to create the ambiance of a room. Lighting adds both style and function and determines the mood of the space. Perfecting the lighting effects in 3D renderings enables designers to accurately communicate the intended mood for a room. Creating lighting effects in FluidRay is fast, easy, and produces beautiful results that will impress your clients! 

Keep reading for detailed instructions on how to bring your renderings to life with interior lighting. 

Step 1: Import Your 3D Model

Create your 3D model in your favorite modeling software. We used SketchUp for this example.

SketchUp 3D Model

livingroom.skp


Once your model is created, import the file into FluidRay. 

FluidRay Import Project

FluidRay works directly with SketchUp (.skp), Rhino OpenNurbs (.3dm), FBX (.fbx), Alias Wavefront (.obj), Collada (.dae), 3DS (.3ds, .ase), DirectX (.X), Stanford PLY (.ply), and STereoLithography (.stl). 

If your filetype isn’t listed here, simply export to an .fbx file within your 3D modeling software and then import into FluidRay. 

Step 2: Set Materials

Let’s begin by setting the materials in the model. By setting materials before adjusting the lighting, you can see how the materials will react in real time when adjusting the lighting. Select an object from the model and then from the drop down menu in the Materials tab, drag and drop the desired material into your rendering. FluidRay has a large library of high quality materials from which to choose and the ability to import additional materials. 

Step 3: Add Environmental Light

Environmental light comes from the outside, rather than from the inside. Environmental light is a global parameter, meaning it will affect the entire rendering, not only one part of it. 

FluidRay Drag and Drop

In this example, we start with the night environment and then we increase the light’s power. 

FluidRay

You can see the room in our model takes on light from the environment as if it is night time outside. Increase the light’s power in the right panel using the Environment tab.

FluidRay Increase Light Power

Step 4: Add Artificial Light

FluidRay

Artificial light includes overhead lights as well as table or floor lamps. We recommend applying the artificial light first without the environmental lights. Simply select the surface you want to emit light and tweak its emission power and color. You can also drag and drop an emissive material onto the surface. 

Emissive material

Go through these same steps for each of the artificial lights in your rendering. 

Step 5: Turn Environmental Light Back On

Turn the environmental light back on so the rendering includes both environmental and artificial lighting. This rendering is really coming together!

Step 6: Finalize and Adjust Your Rendering

In this final step, you’ll tweak the materials, environmental lighting, and artificial lighting to get to the final result. Thanks to FluidRay’s speed and ability to render in real time, you’ll immediately get an idea of how the render will look after each and every material or light change. 

Check out this video that walks you through how to do these steps in real time. 


FluidRay also offers training tutorials for more details on learning how to render images. You’ll create designs quickly and easily, freeing yourself up to focus on imagining interiors for your clients.

If you want to experience how FluidRay can help you inspire your clients, download our software for a free trial. Our pricing is inexpensive so anyone can experience the good side of rendering!


5 Reasons Interior Designers Choose FluidRay for Rendering

There’s nothing like walking into a well-appointed space that has been well planned out yet feels natural and comfortable. Interior designers have a talent for creating these environments but it takes a special dance of communication and coordination with their clients to get it just right. To support this level of communication, designers turn to FluidRay as their choice software for easy and fast rendering.

Here are the top 5 reasons why you’ll love FluidRay rendering software too:

1. Quick Learning Curve

FluidRay’s intuitive interface and straightforward training resources make learning 3D rendering effortless. Our engineers designed FluidRay with usability in mind and the workflow can be grasped in a matter of minutes. To make rendering even easier, FluidRay comes with a large library of environments, materials and backgrounds. Check out our training tutorials for more details on learning how to render images in FluidRay. You’ll create designs quickly and easily, freeing yourself up to focus on imagining interiors for your clients. 

Regardless of technical expertise, anyone can get up to speed on FluidRay in just a few minutes.  

I love how I can drag & drop materials, lights and furniture in my interiors and quickly see the results! I can produce different proposals for my clients in no time. I can even tweak the illumination and materials while they stand by my side!

– Evelyn G.

2. Lightning Fast

With many rendering applications, large images can take several hours to complete. However, FluidRay’s lightning fast technology allows you to create immediately visible images that can be edited as needed, streamlining your workflow! Our engineers use artificial intelligence to ensure super fast performance and there are no GPU limitations. 

I don’t usually have the luxury to spend time figuring out how to make a realistic material or set up a lighting studio for each new product; here’s when FluidRay comes to the rescue.

– Diego P.

3. Affordable

Our pricing plans make FluidRay accessible to anyone with no long term contracts or hidden fees making it the tool of choice for independent designers and firms alike. In fact, ALL3DP recently ranked FluidRay as one of the best rendering tools on the market, comparing it with rendering software that costs considerably more.  Learn more about our pricing options and find a plan that works best for you. 

4. Creates Stunning Designs

Did you know that FluidRay can take your 3d model and transform it into a realistic and beautiful image in a matter of seconds? While designers will review a 2d image and can imagine its full potential, many interior design clients struggle with 2d images and will imagine a space much more confidently with a rendered file. Using FluidRay to communicate by sharing realistic images allows you to better communicate with your clients both during the proposal phase and design phase to get plans exactly right. FluidRay also enables you to make changes to your rendered images on the fly so you can quickly communicate changes, impressing your clients and getting the job done.

Interior Rendering in FluidRay by Sekhar Roy

I downloaded FluidRay, played around with the settings (very intuitive) and in a few minutes I was able to show my clients beautiful images of my designs.

– Ian P.

5. Compatibility

FluidRay is compatible with your favorite modeling software and supports the following formats: SketchUp (.skp), Rhino OpenNurbs (.3dm), FBX (.fbx), Alias Wavefront (.obj), Collada (.dae), 3DS (.3ds, .ase), DirectX (.X), Stanford PLY (.ply), STereoLithography (.stl).

Simply open up FluidRay, click “import model” and select your file. You’ll be rendering in seconds! The included extensive library of materials, models, and lights all readily available in an easy drag & drop interface enables you to create any space you can imagine. 

FluidRay’s extensive features, easy-to-use interface, quick rendering capabilities, affordability, stunning designs, and modeling software compatibility make it the perfect rendering software for interior designers. 

If you want to experience how FluidRay can help you inspire your clients, download our software for a free trial. Our pricing is inexpensive so anyone can experience the good side of rendering!

Watch Site Modeling In SketchUp Tutorial Video

A lot of professional 3D modeling work relates to architectural projects. For large scale developments, there is usually a site development or campus development element in addition to the buildings and other structures. Good site modeling is critical to creating an acceptable model for client projects because the environment needs to complement the structures.

This video comes directly from SketchUp & walks you through the steps to create a site model. Some highlights are how to use a mix of Google Earth & Google Maps views to understand the site; modeling new buildings from scratch; and creating utility scenes for studying.

You expect an official SketchUp tutorial to be pretty sweet and this one doesn’t disappoint. If you’re not into architectural rendering, then this may not be that fun to you, but I think most people doing models will appreciate the techniques and how he shows the capabilities of SketchUp.

Site Modeling in SketchUp

If you haven’t already, then make sure you subscribe to the SketchUp YouTube channel.

Watch How to Create Thai Temple Model in SketchUp Pro 2015

Building architectural models from the ground up takes imagination, an eye for detail, and a solid understanding of your tools. In this video, we see a Thai Temple developed in SketchUp 2015 with the addition all the shapes, dimensions, spacing, materials and textures shown.

The video, from JMsketch04’s YouTube channel. It’s longer than most of the videos we share (38:03), but it’s worth the time.

I especially like the order of the modeling with a good use of library assets and a consistent workflow. If you’ve ever tried building a complex models or ones with lots of assets, then you know that you need an efficient process to make sure everything comes together and avoid having to redo work later.

If you’re new to SketchUp modeling or want to learn how to build models more efficiently, then checkout this video.

Sketchup create 3d Model thai temple

Where to Find .SKP Files

Regular SketchUp users probably already have a big archive of .skp files to draw on for projects, but sometimes you need something new and it helps if you can grab one rather than building from scratch. I did some wandering around the web and found some sources for .skp files. Some are free and some cost a bit, but the nice thing is that these sites are reliable — you can bookmark them and come back whenever you’re searching.

3DWarehouse – https://3dwarehouse.sketchup.com/
No surprise you’re going to find SKP files at 3DWarehouse, but it’s worth mentioning that they have a fun mix of models including architecture, people and products.

SketchUp Texture – http://www.sketchuptexture.com/p/3d-sketchup-model.html
SketchUp Texture has several collections of room and furniture models in the SKP format. I liked a lot of the stuff in the Houses and Villas collection. It also never hurts to have furniture models when you’re figuring out interiors.

TF3DM –
These guys have a little bit of everything. The quality can vary, but it’s worth checking out. I’d definitely check here for military vehicles.

SKPWizard – http://skpwizard.com/freeblocks.php
SKPWizard carries a good selection of office furniture models. They also have some vehicles, construction supplies, and electronics. I’ve visit here before starting on an office interior project.

TurboSquid – http://www.turbosquid.com/Search/3D-Models/free/skp
I’d say their free .skp offerings are mostly related to furniture or home decor, but TurboSquid also has some human and animal models, as well as, some building models. Check them out for starter models to practice on.

GrabCad – https://grabcad.com/library/software/sketchup
I’ve found some gorgeous building models here along with a variety of furniture, mechanical, and other objects. If you’re doing product or industrial design, then make sure you check here for things like gears and motors too.

David Hier – http://www.davidhier.co.uk/freemodels.html
Let’s take a moment to thank David for sharing some of his models for high-end designer furniture. He shares a lot of his stuff on TurboSquid, but make sure to check his site for goodies. His models might be good for a hotel room or lobby project where if you’re going for a contemporary look and feel.

Creative Crash – http://www.creativecrash.com/sketchup/
Creative Crash’s marketplace has a lot of goodies. The quality and prices will vary a lot and some models are a bit pricey, but you’ll find plenty of well done vehicle, electronics, exterior and environmental models to work with.

Nomeradona SketchUp, VRay Resources – http://sketchupvrayresources.blogspot.com/p/free-sketchup-scenes-and-models.html
There is not a lot here, but the few models are well done. I especially like the sofa and padded material models. Hopefully, they’ll keep adding to the site, but I’d pick up the sofa models now to have handy.

SketchUp4Architects – http://www.sketchup4architect.com/sketchup-components.htm
There is a good selection of models here with an emphasis on architectural components (rooms, doors, windows, floors, stairways, etc.). You’ll also find some people, furniture, and vehicles mixed in. This is a good resource for assets to construct rooms or other basic architectural modeling tasks.

SweetHome3D – http://www.sweethome3d.com/importModels.jsp
SweetHome3D offers several collections of models, some with hundreds of files included. In some cases, you’ll be directed away from the site, but I didn’t find anything shady — just more models. Pay attention to the licensing rules.

Modlar – http://www.modlar.com/information/3d-models/
Modlar is the place to get manufacture approved models of appliances, tools, industrial equipment and more. It’s heavy into sinks, faucets and other kitchen and bathroom models, but you also have industrial, furniture and flooring. A good site for anyone doing kitchens and bathrooms, or looking for some well done pieces to refine home models.

TruStile – http://www.trustile.com/design-planning/3d-cad-symbols/sketchup
This is vendor site so you won’t find a variety. That said, TruStile gives you models for about 40 different styles of residential doors. I suggest picking them all up and keeping them as resource for any residential housing project.

Popular Woodworking – http://www.popularwoodworking.com/sketchup-for-woodworking-models
Every model here is for something wooden. Fortunately, you can use wood almost anywhere. A decent selection of models though you’ll see a lot of tables and cabinets. Worth browsing for touches to add to a rustic cabin or home. You might also use the benches for parks or other outdoor settings.

Kolbe – http://www.kolbe-kolbe.com/architectLibrary/index.cfm?pcID=7&pID=169
Another vendor site. This one is focused on Kolbe windows. The models are well made and done to work well with any architectural models. Like with TruStile, I’d grab as many as you can now so you have the for later.

That’s it for now. I’ll keep looking and adding as I discover new sites. Leave a comment if you want to share some of your own models or let us know about some good sites.

Feature image: Asus P6T6 3d model by 3DRegenerator

Cool Video on the Merits of HDRI for 3D Rendering

The images you use as sources and output have a big impact on the realism of your renders. This video from dimensiont on YouTube looks at the value of using HDRI images when doing renderings. I think the video could use a different soundtrack, but the examples given are convincing.

Merits of HDRI in 3D Rendering

In the video, you’ll see the difference in colors, shadows, lighting and reflections between high dynamic range images and formats like jpeg and png. The video does a great job of making the difference in contrast and detail obvious. It also gives you some hints to the value for different lighting environments though I’d say the video could use more lighting examples.

Watch this video if you’re working on placing made objects and people into real-world environments or struggling to fine-tune a render.

3D Rendering Animation of San Francisco Mission Bay Arena

I live in San Francisco so I’m probably more psyched about this than most folks. Found the video on the Golden State Warriors YouTube channel. It’s not the most stylish, but it gives us a look at the design of the proposed arena for the Mission Bay area of San Francisco.

The video provides a tour of the arena starting with the exterior, connected parks, and streets where we can see theaters, nearby office buildings, and a great looking concourse connecting the different outdoor spaces. The interior tour ends in the arena where it looks like a Warriors game is about to start.

I won’t say this is the coolest rendering I’ve seen, but it gets the key points across: green space, mixed commercial in the area, and an arena with plenty of seating.

My only real complaints are the crappy music and the people that look like they were taken from a 90’s SIMs game.

Worth watching if you live in the Bay Area and have been following the Mission Bay developments. Also, worth a watch if you’re looking for inspiration for your own architectural rendering video.

San Francisco Venue 3D Rendering Animation